Posts

Today In the Toymakers Shop

Image
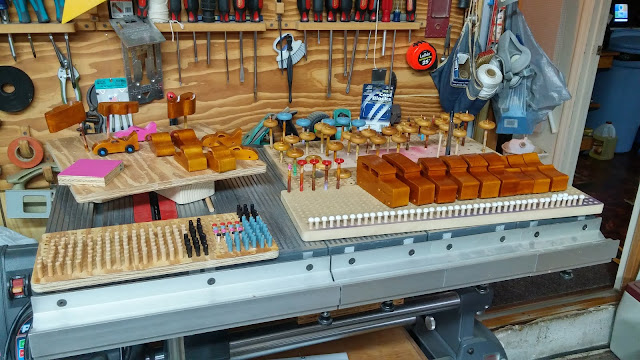
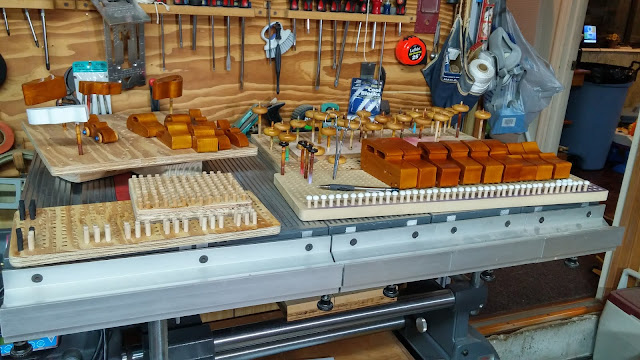
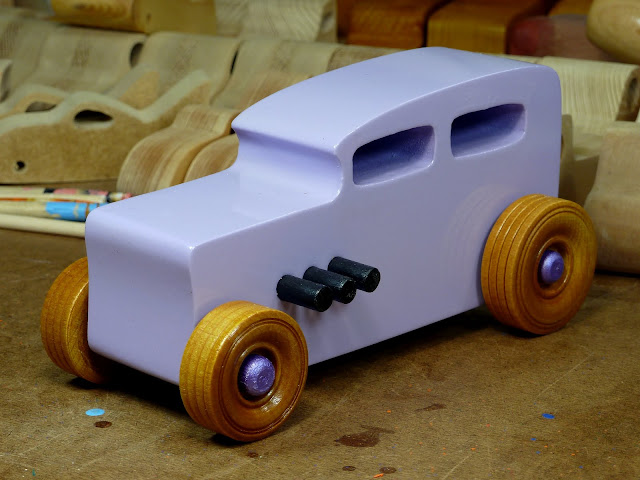
It doesn't look like much but there is more work here than it you would think from looking at the photos. A bunch of little parts got painted and clear coated. Some new paint tried out. And a few cars assembled. Wooden Toy Cars Parts Here a freshly assembled bat car is sitting on a test board. Yes the pink paint does one coat coverage on bare plywood. Wooden Toy Car Bat Car  Below is a lot of exhaust pipes ready to install in the Hot Rods. I takes a lot longer than you might think to make these. They are painted and clear coated. Wooden Toy Cars Exhaust Pipes and Hubs SPme seriously red wheels.  The clear shellac makes the color pop. Wooden Toy Cars Seriously Red Wheels Two assemble bat cars. The Pink one is an experiment with brushing paint that didn't turn out to well. It's still a solid playable toy but ot really didn't work out well. Wooden Toy Cars Bat Cars Pink - Amber Shellac

Today in the Toymaker's Shop

Image
I should have taken some photos of the car the axle pegs got stuck halfway in. I was so intent on the repair that I totally forgot about taking photos of the repair. I sawed the axle pins with a flush cut saw and drilled the stubs out with a drill press and rigged up temporary jig to hold the car body in the right place with the front wheels on it. It worked perfectly. So good that the only way I can tell you which one it is the scratch on the back of one of the wheels where I scraped it with the saw. Lesson learned: Always dry fit everything. The reason they got stuck was that the pegs were to long. Some of today's work.  The ones I didn't for get to photograph. Wooden Toy Cars Some of today's Work. Wooden toy Hot Rods waiting for exhaust pipes ans wheels. The finish is brushed amber shellac on pine.  Wooden Toy Cars Hot Rod Waiting for Exhaust Pipes and Wheels Wooden toy cars with what is probably their last coat of shellac. I sand and recoat until I;m ha

Assembly In Progress

Image
Looking over some of the bodies I've been working on I decided that the finish was good enough on some of them. I started assembly and worked at it until help arrived (3 yer old grandson) who wanted some shop time with papa.  I ruined one that is not in the photos. Both back axle pegs seized before they were fully inserted. It's not the first time this has happened. I can cut the wheels off and re drill the holes but its a pain. I really think I should start drilling the holes 1/64 larger than the plan and pining the axle pegs.  20170720_210615 Wooden toy cars & Trucks - Play Pal Monster Trucks - Hot Rod Freaky Fords - Ford 32 For Sedan - 32 Ford Coupe Garage Shop Workbench

How do I support small parts while the paint drys?

Image
When painting small parts such as wheels and even large car bodies like the Hot Rod Freaky Fords need to be supported while the paint or shellac dries.  SInce all of these have holes for axles or other things such as exhaust pipes I devised a way to take advantage of this. I insert dowels in the holes apply the finish and  then I can insert the other end of the dowel into a hole drilled in the stands, Various paint stands I have made. The one on the left is the first one I made. Its half inch plywood which turned out to be to thin to get the holes deep enough to support larger items. The holes are to far apart. Closer holes give you more options. It is also to narrow heaver items have tipped it over. I keep it because it is perfect for 1-1/2 inch wheels. Threes of these are made from BC plywood. Not my favorite. BC ply is seldom flat and when you are drilling nearly all the way through it breaks through. The smaller one has masonite glued to the bottom because of this. The

Hot Rod Freaky Ford 27 Ford T Bucket Lavender/Lilac

Image
Hot Rod Freaky Ford 27 T Bucket in Lavender/Lilac. I don't know what the color is really called. It's oops paint from Home Depot. The color varies a lot depending on the lighting or your monitor. On some monitors it looks grey I'm told.  The original Plans for the 27 T Bucket called for a windshield made of wood, I did not like the look of it and the eight inch thick windshield certainly was not not strong enough made from the materials I have. Leaving off the windshield simplified the build.  Hot Rod Freaky Ford 27 Ford T Bucket  Lavender Amber Shellac Metallic Purple Hot Rod Freaky Ford 27 Ford T Bucket  Lavender Amber Shellac Metallic Purple Hot Rod Freaky Ford 27 Ford T Bucket  Lavender Amber Shellac Metallic Purple Hot Rod Freaky Ford 27 Ford T Bucket  Lavender Amber Shellac Metallic Purple Left Rear Hot Rod Freaky Ford 27 Ford T Bucket  Lavender Amber Shellac Metallic Purple Left Side

Answering Some Questions About Making Toys From MDF

Image
A Full Set of Hot Rod Freaky Ford Toy Cars Made From MDF Will MDF stand up to the hammering a small child will dish out, MDF always seems so soft, especially around the corners/exposed areas . Yes, MDF hold up to children. My grandson Odin, has a toy that you put balls in tight fitting holes and use a hammer to pound the balls through the holes. The hammer head is MDF. At this point it has survived at least two children. The hammer head is showing signs of wear but it still has lots of pounding yet to go. Note that there are many manufactures of MDF and even with the manufacturer's product line there are different grades. You need to test the MDF to see if it is suitable for your intended purpose. In the case of my Hot Rod Freaky Fords. These are essentially solid blocks of MDF that  have some holes drilled in them. Yes you can break them, but you have to work at it. I can't break one with my hands which I think might be a good rule of thumb. If you can break it wit

Wooden Toy Car - Hot Rod Freaky Ford - 32 Sedan - Lavender

Image
A 1932 Ford Sedan From the "Hot Rod Freaky Ford Series" in a pale lavender. The body is made from two pieces of 3/4 inc MDF shelving glued up and cut on a scroll saw to make the 1-1/2 inch thickness.  The body is first primed and sealed. The purpose of the primer coat is to seal the MDF, get rid of the fuzzies and provide a smooth surface for the paint. Since the paint I am using is water based I don't want to apply it to MDF directly as it causes the MDF to swell as the water gets absorbed and makes the surface very rough. The lavender color is Behr Oops paint from Home Depot applied with an airbrush sanding with 220 grit sandpaper between coats. Sur to the very high humidity where I live I usually have to let each coat dry overnight before sanding.   The top layer is Rust-Oleum Clear Glaze. This gives it a very glossy finish. The exhaust pipes and hupd are brush painted with acrylic craft paint and top coated with clear shellac. The wheels are brushe