Posts

Can I use my belt sander to sand toys?

Image
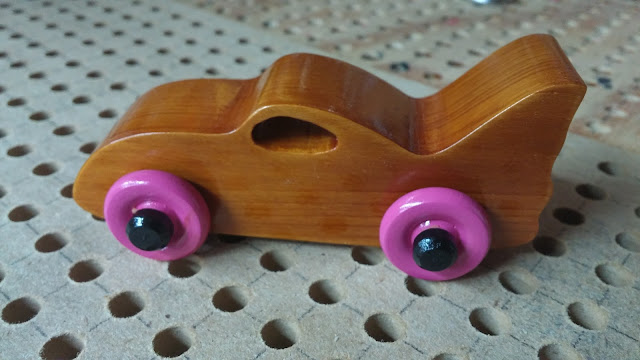
The 90% sanding on this little truck body was done using two belt sanders. A Shopsmith 6x48 belt sander with a worn 80 grit belt and my Delta 1x42 strip/belt sander with a silicon carbide 220 grit belt. It's about as smooth as you can get pine. Wooden Toy Truck Sanded With Belt Sanders I use the larger Shopsmith sander to do the heavy work an smooth out the flat areas and in this case remove the finish from the recycled wood. Then I use the Delta belt sander to fine tune and do the final smoothing. It takes a little practice an a light touch. Even 220 grit belts can can chew of a bunch of wood in a hurry. It is sort of like carving with a sanding belt. I can literally reshape the toy as I;m smoothing it. As for the 10% I eased the corners with a foam fingernail file. If your hand is steady enough you could do this with the bet sander. However, I can't control the wooden toy well enough to give me satisfactory results. I sanded inside the window with a shop made scrol

Play Pal Bat Car With Red Wheels - On the Toy Makers Bench

Image
Playing with color on the wheels.  The blue hubs were what I had made up already and they don't look bad but I think black would look better. The hubs and wheels have two coats of acrylic paint and one coat of shellac. Big surprise for me was how the red color really pops the red paint. not only did it make them glossy but the red color now looks more intense. Wooden Toy Car - Play Pal - Bat Car - Shellac - Red Wheels - Blue Hubs Odin's Toy Factory #odinstoyfactory #woodentoys #woodentoycars #handmade

Play Pal Bat Car With Pink Wheels - On the Toy Makers Bench

Image
I'm playing around with colors because the kids like the colors. My personal experience and that of people who sell at craft shows tells me this. Adults tend to go for the wood grain and the kids go for the bright colors. I have this bright pink paint I'm experimenting with so I decided to see what it would look like as wheels. Black was the only axle pin color I had that worked with the pink. 2017-08-05 14.13.07 Wooden Toy Car - Bat Car - Pink Wheels The body is pine with several coats of amber shellac. The Wheels are painted with pink acrylic and top coated with clear shellac. The hubs are black acrylic with clear shellac on top. Odin's Toy Factory #odinstoyfactory #woodentoycar #handmade

Today In the Toymakers Shop

Image
It doesn't look like much but there is more work here than it you would think from looking at the photos. A bunch of little parts got painted and clear coated. Some new paint tried out. And a few cars assembled. Wooden Toy Cars Parts Here a freshly assembled bat car is sitting on a test board. Yes the pink paint does one coat coverage on bare plywood. Wooden Toy Car Bat Car  Below is a lot of exhaust pipes ready to install in the Hot Rods. I takes a lot longer than you might think to make these. They are painted and clear coated. Wooden Toy Cars Exhaust Pipes and Hubs SPme seriously red wheels.  The clear shellac makes the color pop. Wooden Toy Cars Seriously Red Wheels Two assemble bat cars. The Pink one is an experiment with brushing paint that didn't turn out to well. It's still a solid playable toy but ot really didn't work out well. Wooden Toy Cars Bat Cars Pink - Amber Shellac

Today in the Toymaker's Shop

Image
I should have taken some photos of the car the axle pegs got stuck halfway in. I was so intent on the repair that I totally forgot about taking photos of the repair. I sawed the axle pins with a flush cut saw and drilled the stubs out with a drill press and rigged up temporary jig to hold the car body in the right place with the front wheels on it. It worked perfectly. So good that the only way I can tell you which one it is the scratch on the back of one of the wheels where I scraped it with the saw. Lesson learned: Always dry fit everything. The reason they got stuck was that the pegs were to long. Some of today's work.  The ones I didn't for get to photograph. Wooden Toy Cars Some of today's Work. Wooden toy Hot Rods waiting for exhaust pipes ans wheels. The finish is brushed amber shellac on pine.  Wooden Toy Cars Hot Rod Waiting for Exhaust Pipes and Wheels Wooden toy cars with what is probably their last coat of shellac. I sand and recoat until I;m ha

Assembly In Progress

Image
Looking over some of the bodies I've been working on I decided that the finish was good enough on some of them. I started assembly and worked at it until help arrived (3 yer old grandson) who wanted some shop time with papa.  I ruined one that is not in the photos. Both back axle pegs seized before they were fully inserted. It's not the first time this has happened. I can cut the wheels off and re drill the holes but its a pain. I really think I should start drilling the holes 1/64 larger than the plan and pining the axle pegs.  20170720_210615 Wooden toy cars & Trucks - Play Pal Monster Trucks - Hot Rod Freaky Fords - Ford 32 For Sedan - 32 Ford Coupe Garage Shop Workbench

How do I support small parts while the paint drys?

Image
When painting small parts such as wheels and even large car bodies like the Hot Rod Freaky Fords need to be supported while the paint or shellac dries.  SInce all of these have holes for axles or other things such as exhaust pipes I devised a way to take advantage of this. I insert dowels in the holes apply the finish and  then I can insert the other end of the dowel into a hole drilled in the stands, Various paint stands I have made. The one on the left is the first one I made. Its half inch plywood which turned out to be to thin to get the holes deep enough to support larger items. The holes are to far apart. Closer holes give you more options. It is also to narrow heaver items have tipped it over. I keep it because it is perfect for 1-1/2 inch wheels. Threes of these are made from BC plywood. Not my favorite. BC ply is seldom flat and when you are drilling nearly all the way through it breaks through. The smaller one has masonite glued to the bottom because of this. The