Posts

New Etsy Shop Listing - Handmade Wooden Toy Car - Bat Car from the Play Pal Series - MDF - Green

Image
Handmade Wooden Toy Car - Bat Car from the Play Pal Series - MDF - Green   Experimenting with acrylic paints and MDF on this one. Brush painted with acrylic house paint. Oops paint from Home Depot. No primer, no sealer, just several coats of paint sanding between coats until I was happy with how smooth the surface was. Flat paint is easier to apply, and it covers better. At least that is the way it seems to me. When I am using acrylic paints, I have to relearn how to paint with it when the color changes.

Free Plans For Bad Bob's Custom Motors Wooden Toy Cars

Image
John Lewman over at ToyMakingPlans.com created these plans for me and released them in the forum . If you are not a member and you are interested in toymaking you should join the fun. My grandson loves these wooden toys. Bad Bob's Custom Motors Wooden Toy Cars Green & Yellow Bad Bob's Custom Motors Wooden Toy Cars Yellow

In the Shop - Blue & White Bad Bob's Custom Motors Coupe

Image
Handmade Wooden Toy Car - Bad Bob's Custom Motors - Blue & White Just out of the clamps. Painting with contrasting colors looks really good but, is tricky to pull off. You have to paint the parts separately masking off the spots where the glue will go. Handmade Wooden Toy Car - Bad Bob's Custom Motors - Blue & White Fitting all the parts together after they are painted is quite tedious. There is a risk of damaging the finish with tools or glues.  Being wood, fitment is not precise some parts need to be carefully modified to fit without damaging the paint. Handmade Wooden Toy Car - Bad Bob's Custom Motors - Blue & White  If you look closely at the photo above, you can see one tiny spot just above the fender where the paint was scratched off during assembly. Handmade Wooden Toy Car - Bad Bob's Custom Motors - Blue & White I learned the hard way that you must clean the jaws of your clamps before clamping painted parts together and b...

What kind of paint are you using for your Bad Bob's Custom Motors cars?

Image
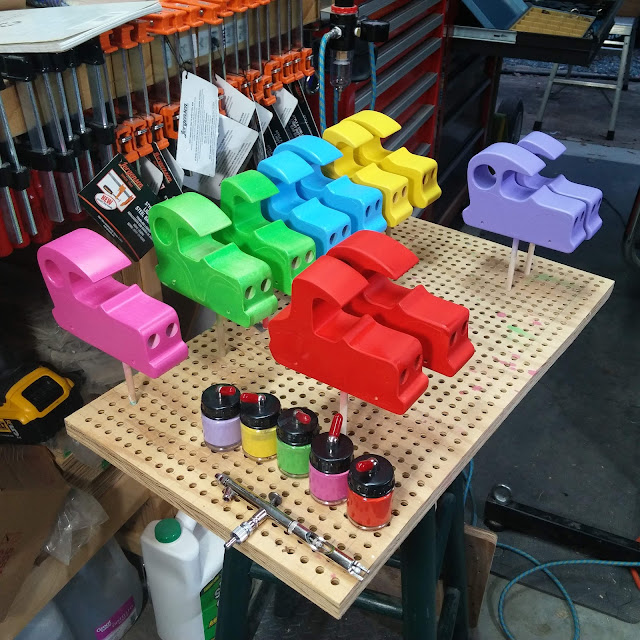
Bad Bob's Custom Motors I use a variety of paints from various sources. I like the acrylic house paints the best. All of the paints are nontoxic when cured.  I like to use a white primer to seal the wood and make the colors pop. In this case, I am using Zinsser B-I-N shellac based primer.  I prefer to use an airbrush for painting toys but, I have to paint outdoors, and the weather where I live does not cooperate, and I have to wait or use a brush. I used an airbrush for these wooden toy cars. My airbrush is a Badger Anthem 155.  I prefer acrylics over all other paints. They clean up easily, cover well, and are readily available in a vast array of colors. To clean, I flood with water to get rid of the bulk of the paint. The remaining paint is easily removed with ammonia-based cleaners such as window cleaner. I use household$ ammonia to remove dried paint.  I used the following to paint these wooden toy car bodies. Pink - Behr Acrylic House Paint Green - ...

New Etsy Listing - Handmade Wooden Toy Car, Hot Rod 1927 T-Bucket From the Hot Rod Freaky Ford Series

Image
Handmade Wooden Toy Car, Hot Rod 1927 T-Bucket From the Hot Rod Freaky Ford Series Pink This one had a small problem. The hole for the peg doll wasn't drilled deep enough. I carefully set up my drill press and bit to extend the depth of the hole and added about 1/4-inch. The result was not what I was expecting. Either the bit was too small, or something was misaligned. The peg doll got stuck in the hole when I tested it. After trying several different tools sanding, I finally wound up using a diamond burr mounted in a rotary tool to enlarge the hole.

New Etsy Listing - Handmade Wooden Toy Car, Hot Rod 1927 T-Bucket From the Hot Rod Freaky Ford Series

Image
Handmade Wooden Toy Car, Hot Rod 1927 T-Bucket   My first peg doll. It came out much better than I expected. I had this car and one other collecting dust waiting for me to get around to painting a peg doll. Painting inside the hole is a problem. It's hard to do and get it to look good, and it makes the hole smaller. The wood swells a little from the paint and its hard to sand. If I paint after drilling the hole, I have trouble keeping paint out of the hole. I finally decided to try drilling the hole after painting. After trashing a couple of paint jobs, I figured out that the way to drill them out is to wait until the car is assembled and painted. I put blue painters tape over the area where I need to drill and use a good quality brad point or Forstner bit that is very sharp. Waiting until the car is finished ensures the hole is vertical. No jig is required to get the hole straight. I hold it by gently clamping with a padded hand screw.  

New Etsy Listing - Handmade Toddler Puzzle, Rooster, Chicken, Very Easy Assembly

Image
Handmade Wooden Toy Puzzle For Toddlers - Rooster - Chicken Intended as a simple puzzle for kids and toddlers three years and older just getting into puzzles. The Cat has only four parts. It is more difficult than the White Rabbit sold separately but still quite simple. It is also a freestanding stacking toy. It is a bit tricky to do but, My four-year-old grandson can do it. These puzzles have been thoroughly grandson tested for playing fun and durability.  Handmade Wooden Toy Puzzle For Toddlers - Rooster - Chicken Tray puzzles are much easier to assemble and store than your typical wooden puzzle. I think they are much more comfortable for children. The pieces are painted only on one side to make it easier for kids to put together. The edges and backs of the pieces are unfinished. Handmade Wooden Toy Puzzle For Toddlers - Rooster - Chicken Every part of the puzzle is non-toxic. I made the tray and puzzle parts from premium grade pine, not construction ...