Posts

Some Thoughts on Scroll Saws

Image
I started with a cheap Taiwanese cast iron saw. It immediately became apparent that the pin end blades were not going to hack it. I installed a modification that let me use good quality pinless blades and I was on my way. I made some nice Victorian fretwork pieces with that setup. Blade changes were difficult. Oak Scrollsaw Fretwork Shelf Cut On An AMT Castiron Scrollsaw These were made in Taiwan and sold under several different brands. They also made several models. There are a lot these scroll saws still available on the used market. You can pick one up for $50 or even less. Pinless upgrades were still available last time I looked. The blade changing left a lot to be desired and the built-in blower was worthless. I replaced the blower with an old aquarium pump. It's a good idea to have a few extra blade clamps. When a blade breaks the clamps sometimes flying across the shop. As far as cut quality goes it cut very well. Glass smooth surfaces were easy to get in har

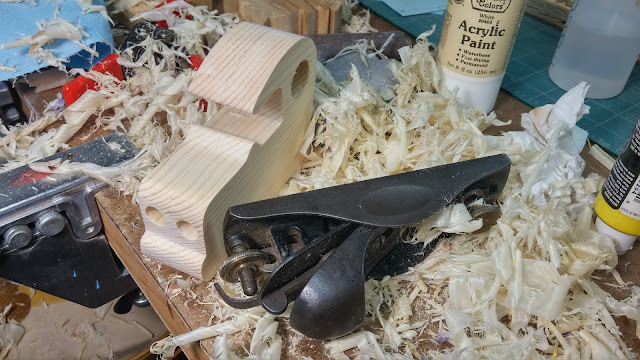
Using a Plane When Making Wooden Toys

Image
Stanley Block Plane Used to Smooth the Flat Surfaces of This Wooden Toy Car Body I don't know why I never thought of this before. Possibly, because I have been conditioned to think of planes as something you use for making furnture or trimming a stuck door. I have watched many YouTube videos about making wooden toys. I can only recall one instance where a plane was used. I saw this yesterday. Lots of toys have flat surfaces that could be planed. Some of them will require a bit of ingenuity to figure out how to hold the irregular shapes.  I can cut a pretty good line with a scroll saw. However, it's almost never perfect. This is especially true with the thicker bodies where the blade will sometimes try to follow the grain. I can cut it smooth enough that I can't see the ripples with my naked eye, but my fingers know the difference. The imperfections can be amplified when you apply paint or other finish and it really shows when you sand between coats. Better and eas

Tools - Jorgesen Heavy Duty Bar Clamp 

Image
Jorgensen Clamps are the best clamps I own. Especially the Heavy Duty versions. I had a few of and was picking up a few at a time until I I found out they were moving production to China. I went to every Home Depot in my area and bought all of the Made in USA clamps I could find.  They were pretty easy to spot because they all had wood handles while the Chinese made ones had the newer style rubber coated plastic handles. When I heard the company folded I hit the stores again and bought what they had left that I thought were good enough.  These were all made in China. The fit and finish were not as good as the made in USA clamps but so far I really haven't had an issue with them. These are big heavy clamps and I don't use them for everything. Every once in awhile when you really need to squeeze something hard these will do the Job. With 1500 pounds of clamping pressure it's almost like clamping. In a vise. I still search for used ones. When I find them, for sale on eBa

Resawing Small Irregular Shaped Parts - Can it be done?

Image
Handmade Wooden Toy Car - Bad Bobs Custom Motors Coupe Handmade Wooden Toy Car - Bad Bobs Custom Motors Sedan I started making these before the "official plans were released. I only had drawings and no final dimensions. I made some assumptions and one of them turned out to be wrong. I made the fenders to thick.  Now I had a pile of fenders the wrong size. I needed to remove 1/2 inch or make new fenders. I could sand them to size on a belt sander but the weather is miserable and I sure don't want to do that kind of sanding in my garage. Scrollsaw? No way I could hold it straight enough and they would likely break. Use the table saw. Forget it. I could have nightmares from thinking about it. I tried every hand saw I have that I thought had a chance of working. I have a Dozuki saw that would have done it if it had bee just a bit wider. The back kept the saw from cutting all the way through. I have a Shopsmith bandsaw with a Carter guide and a 1/8 inch blade

How do you keep parts from moving while glueing?

Image
I usually just add more clamps. Several of the clamps in the photo are there to hold the pieces aligned. It can get a bit messy at times but I keep my tools including clamps waxed with Johnson's Paste Wax threads and all. Glue just pops right off. Clamping an Gluing a Toy Truck Bed A little tiny pinch of clean fine sand sprinkled on the glue helps a lot. I would not do this if you are going to drill or cut later.  I'm not fond of having to keep a bag of sand around. Some people use salt instead of sand. I've always been leery of this. It might change the chemical composition of the glue or wood and do something undesirable. I have never tried this. Dowels, pins, etc can be used to keep things aligned but they add extra steps. You could use a pin nailer for some things but you have to keep it from moving while you put the pins in. Might as well clamp it. The thinner the coat of glue is the less of a problem you will have. This is tricky for me. The thinner

Some Thoughts on Wooden Wheels

Image
The following are some thoughts that came to mind while watching the video included at the end of this post.  I've made hundreds maybe thousands of wheels using the hole saw method. It works, and it can work well, but as with anything, there are pluses and minuses. I would never use vegetable oil to finish anything. Vegetable oil can and will eventually go rancid and can mold. If you want to use an oil and beeswax finish, use mineral oil. Mineral oil will not spoil. Wheels should have spacers between the wheel and the body. I use nylon washers, but metal washers will work. If you do not use spacers, the wheels will rub against the body. Not only will this remove the finish and eventually wear into the wood but the additional friction increases the rolling resistance. Sometimes to the point where the wheels slide instead of turning. Always dry fit you axle pegs with the wheels if they are too tight or too long and you don't know this before you add glue, you could ruin the toy.

Etsy Listing - Wooden Toy Car - Hot Rod Freaky Ford - 1927 Ford Coupe - Model-T - Satin Polyurethane - Amber Shellac - Purple - Black - Pine 565353086

Image
The second pine wooden toy hot rod finished with satin polyurethane. Polyurethane really is a great finish for toys as well as furniture. Wood furniture such as a table where you expect there to be a lot of wear and abrasion will generally be finished with polyurethane. This is especially true if the furniture is made in a small home workshop. you can get quite good results using brushes or wiping it on with a lint free cloth. Sounds exactly like the finish you need for toys doesn't it. This is the second car I made with this color scheme. I made thes mainly to see what they would look like. Very nicely they turned out I think. What do you think? One of the things I really like about the polyurethane is that the more coats I put on it sanding with finer grits in between the smoother it gets until at some point it just becomes butter smooth to the touch. Wooden Toy Car - Hot Rod Freaky Ford - 1927 Ford Coupe - Model-T - Satin Polyurethane - Amber Shellac - Purple - Black -