Posts

Here There Be Dragons - Clamping & Glueing Handmade Toy Dragon

Image
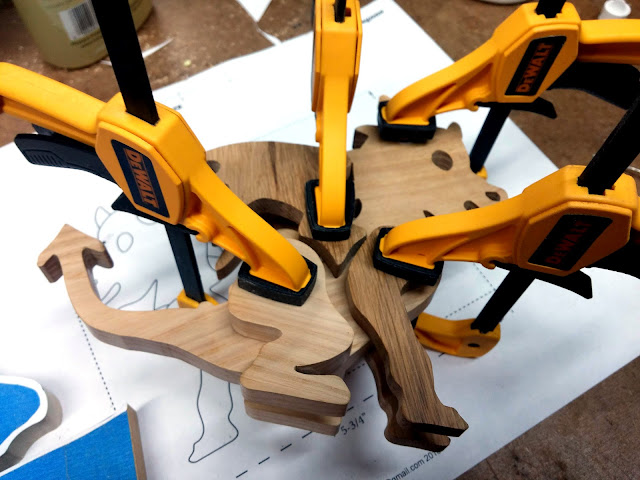
I have just started making dragons. They are pretty simple to assemble, but gluing and clamping can be a challenge. You need to get the legs lined up correctly so the toy dragon will stand like they should. The parts always want to move around. Handmade Wooden Toy Baby Dragon in the Clamps Handmade Wooden Toy Baby Dragon Completed I use Titebond No-Run, No-Drip Wood Glue for this. This glue dries clear, sets up fast, and doesn't seem to move around asmuch. Titebond No-Run, No-Drip Wood Glue I prefer to use my Dewalt DWHT83191 4-1/2" Small Trigger Clamps for clamping. They deliver more than enough pressure and the one hand operation eases clamping. Dewalt DWHT83191 4-1/2" Small Trigger Clamp Spring clamps are fast but difficult to get aligned and the pressure isn't adjustable. Dewalt DWHT83191 4-1/2" Small Trigger Clamp I have some small F-Clamps but these almost require three hands. I'm not a big fan of these clamps they

Replacing My Harbor Freight Bench Top Drill Press With A Grizzly G7943 Drill Press (Update)

Image
I have done all the repairs and modifications and used the drill press for a while on several small projects. I'm going to call this a success. Replacement South Bend Chuck on MY Grizzly Drill Press The chuck worked just as I had expected. It works with bits smaller than the spec sheet indicates and is much better than the chuck that came with it. So much better than I'm considering buying a larger version for my large drill press. I got exactly what I wanted. A good drill press that would handle smaller bits. I use drill bits down to wire gauge sizes that neither my Shopsmith or larger drill press can handle. For production purposes, I didn't want to have to fool around with adapters or changing chucks. Some of the knobs were damaged, and I replaced them with these red ball knobs I found on Amazon. They came 10 to a bag, but they cost only $7.95. I had forgotten how much better I like ball knobs on a drill press. I plan to add these to some of my other tool

Converting Bitmap Patterns to Scalable Vector Graphics (SVG)

I'm not an expert with either of the software packages discussed here. Once I know what I want to do I ask the Google oracle for help and it always provides. If you have questions, you should ask Google. There are a lot of videos on YouTube, and some books are available. The learning curve is steep. If you are only going to make one toy and don't intend to make batches or modify the patterns, it may not be worth the effort to learn about these tools. This isn't a tutorial. It is a simple explanation of how I use Gimp and Inkscape in my toymaking. The first step I take when making something for the first time is to convert the patterns to SVG. I load the bit map patterns into Gimp and clean them up. The bitmaps get copied into Inkscape and converted into the SVG format. Why? First I get sharp, precise lines when you print the patterns. When you print from bitmaps the edges of the lines are jagged and fuzzy. If you want to enlarge the pattern, it gets worse. With the

Special Order For Some Play Pal Pickup Trucks

Image
I've been working on a custom order this weekend. All ways make more than I need for the order because something might happen. I could break something or wood being what it is might split, crack or fall apart. I started this batch with 14 trucks I'm down to 10. I expect 10% or greater loss when working with this kind of pine. I once dropped a toy covered with wet paint in the dirt. If I find any defects the toy gets scrapped. I have played around with repairing them, but in most cases, it's easier and faster to toss them and make another toy. Making extra toys saves time when something goes wrong. A customer purchased one of my Play Pal Pickup Trucks from my Etsy shop and asked for more. Arranging Patterns To Avoid Defects Trucks cut and ready for sanding. I started with fourteen toy trucks, and already I'm down to eleven. Handmade Wooden Toy Trucks Toy Makers Shop Play Pal Trucks Finished with Shellac and Ready For Assembly The first two trucks are

How many clamps does it take to hold a dragon?

Image
Four for this one but he is pretty small. This one goes to Odin for testing, and the next one goes into the shop. If I cut and glued up all yen of the dragons in the set at one time, it would take 40 to 50 clamps.  Handmade Wooden Toy Dragon In the Clamps I  made seven dinosaurs and started the dragon series this weekend. My grandson got all of the dinosaurs. Two were special orders from him but, all of the dinosaurs were tests to see how small I could make them and to develop a simple way to make different size patterns quickly. The smallest size I could easily make is a body length of 1-3/4 inches. Any smaller and I am dealing with parts that are 1/4-inch long and smaller. That is about as small as I can go without resorting to hand sanding.

Etsy Shop Listing Update - Handmade Wooden Toy Car, Hot Rod 1927 T-Bucket From the Hot Rod Freaky Ford Series with Peg Doll

Image
Handmade Wooden Toy Car, Hot Rod 1927 T-Bucket From the Hot Rod Freaky Ford Series with Peg Doll A hot Rod modeled after a 1927 Ford T-Bucket and made from a single block of pine wood. The toy is hand painted with non-toxic acrylic paints and amber shellac.  Wheels are made from birch hardwood. The standard size peg doll adds an extra dimension to pretend play and is compatible with many other peg dolls.  These are great gifts. Use them to decorate a child's room, nursery or office space. One customer used a toy car of mine for a shower cake topper. Length: 6 inches Height: 3 inches Width: 2.5 Inches These are available in almost any color you can imagine. Other types of wood are also an option. Oak, premium pine and poplar hardwoods are readily available. Other hardwoods can be ordered. Custom orders are welcome and can be placed in my Etsy Shop . You can see other Hot Rods here. I have many other wooden toy cars in my shop with more being added all the time.

Etsy Shop Update - Wooden Toy Car, Hot Rod 1927 T-Bucket From the Hot Rod Freaky Ford Series

Image
Wooden Toy Car, Hot Rod 1927 T-Bucket From the Hot Rod Freaky Ford Series The body is cut from a solid piece of pine with a scroll saw, not laminated. The paint is various colors of non-toxic acrylic paint. The birch hardwood wheels are finished with amber shellac. I made these cars with holes for peg people before by drilling the hole before I painted the body. I was never satisfied with the results.  It was hard to paint and sand inside the holes, and I did not think it looked good. The curved bottom made it a challenge to drill the hole verticle. The kids didn't care. This time I drilled the hole after the painting was done. You need to use a good quality, very sharp, forstner or brad point bit and drill slowly with a drill press to avoid chipping the paint. A bit of blue painters tape may help with this. I drilled these with the car fully assembled. Drilling after assembly ensures that the hole is vertical and no jigs are required.